

Having media on your WordPress website is among the best techniques to prolong your visitor session or keep your readers engaged. However, you may come across a notification stating your files exceeds the maximum upload size at some point.
If you’ve ever been in that situation, we hear you. In this article, we’ll show you how to tackle that problem. Let’s see the six easy tips for increasing the maximum upload size on your WordPress website.
Table of Contents
1. Check Your Hosting Provider
If you’re a WordPress beginner or are short on time, this method is the way to go.
Typically, a WordPress hosting plan comes with customer support which you can reach for help. Asking your hosting provider to get the work done is the fastest, most convenient way to have your WordPress website’s maximum upload size increased.
That way, you’ll get more time to focus on other things, including content creation or performance optimization.
2. Update the .htaccess File
Adding a string of code to your .htaccess file will be ideal if your website is hosted on an Apache webserver. Thus, check if your provider uses said server to make sure this approach can be implemented.
Before modifying your .htaccess file, create a file backup if something goes wrong as the file is rather sensitive.
Then, locate the file on the root directory (public_html) over your website control panel or an FTP Client. Suppose you can’t find the folder, check the hidden files. Once you’ve found it, insert the code below at the end of the file:
- php_value upload_max_filesize 32M
- php_value post_max_size 64M
- php_value memory_limit 128M
Note that you are allowed to modify the number to cater to your website needs. Lastly, don’t forget to save the changes.
3. Modify the PHP.ini File
The PHP.ini file defines the default PHP configurations, including file timeouts, resource or memory limits, and file upload sizes.
Begin tweaking your php.ini file by locating the PHP folder on your website’s root directory. You can access the file through your website control panel or an FTP client. Once found, add the below’s code into the file:
- upload_max_filesize 32M
- post_max_size 64M
- memory_limit 128M
Be careful when placing the extension code in both the .htaccess and PHP.ini files. Don’t confuse the M value unit with MB, as that’s the language the PHP uses.
When all is done, save the changes to make sure your website run with the new settings enabled.
4. Change PHP Options via cPanel
cPanel makes it especially easy to perform this task. With the control panel, you can easily change the PHP configuration using the dashboard.
Login to the cPanel and find the Software section. Then, you’re going to choose the Select PHP Version subsection.
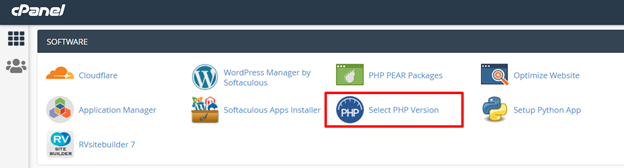
Once you’re in, the interface should look like this:
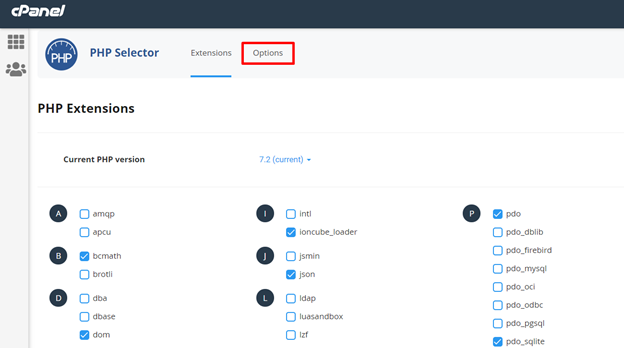
Next, click the Options menu. There you can enter the value for the max_execution_time, max_input_time, memory_limit, post_max_size, and upload_max_filesize. If you’re unsure about the right numbers to input, consult your provider.
Latest Posts:-